@Vengineerの戯言 : Twitter
SystemVerilogの世界へようこそ、すべては、SystemC v0.9公開から始まった
はじめに
Apple M1搭載の Macbook Air と Macbook Pro と Mac mini では、M1に接続している PCIe デバイスが違います。
上記のことから、Apple M1 には 3つの PCIe Port があるようです。
dts から PCI Express の Port を確認する
dts ファイルの この部分 が PCIe Controller になります。
レジスタ空間ですが、以下のように 6つ あります。
- PCI Configuration Space
- IP Core
- AXI Bridge
- Port (0)
- Port (1)
- Port (2)
            reg = <0x6 0x90000000 0x0 0x1000000                                                                 /* config */
                   0x6 0x80000000 0x0 0x100000  0x6 0x8c000000 0x0 0x100000                                     /* core and AXI bridge */
                   0x6 0x81000000 0x0 0x20000   0x6 0x82000000 0x0 0x20000   0x6 0x83000000 0x0 0x20000>;       /* ports */
Mac mini の場合、Port に以下のように接続されているのだと思います。
また、perst-gpios と clkreq-gpios なるものがあります。
pinctrl-0 = <&pcie_clkreq_pins>;
と
            perst-gpios = <&gpio 152 0   &gpio 153 0   &gpio 33 0>;
            clkreq-gpios = <&gpio 150 0   &gpio 151 0   &gpio 32 0>;
の pcie_clkreq_pins は、gpio のところの下記のようになっています。pcie_clkreq_pins ということは、PCI Express の CLKREQ# 信号のことだと思います。この信号が変化すると、GPIO から割り込みが入るようになるんだと思います。
ここでも 3 ピンありますので、3つの PCIe Port は正しいと思います。clkreq-gpios でしていしている GPIO のピン番号は、下記のように pcie_clkreq_pins と同じピン番号になっています。
            pcie_clkreq_pins: pcie_clkreq_pins {
                pins = "gpio150", "gpio151", "gpio32";
                function = "periph";
            };
perst-gpio は、PCI Express のリセット信号(#PERST) です。こちらも 3つあります。PERST# に関しては、デバイスドライバの ここ で次のように制御しています。PERST# を 0 に、ポートを初期化 (pcie_apple_m1_init_port(pcie, idx)、Reference Clockのドライブ (pcie_apple_m1_setup_refclk(pcie, idx)、ポートの電源制御 (pcie_apple_m1_port_pwron(pcie, idx)、PERST# を 1 にして、リセットを解除する
	gpiod_direction_output(pcie->perstn[idx], 0);

	pcie_apple_m1_init_port(pcie, idx);

	snprintf(tunable_name, sizeof(tunable_name) - 1, "tunable-port%d-config", idx);
	res = pcie_apple_m1_tunable(pcie, tunable_name);
	if(res < 0)
		return res;

	rmwl(0, PORT_APPCLK_EN, pcie->base_port[idx] + PORT_APPCLK);

	res = pcie_apple_m1_setup_refclk(pcie, idx);
	if(res < 0)
		return res;

	pcie_apple_m1_port_pwron(pcie, idx);

	rmwl(0, PORT_PERST_OFF, pcie->base_port[idx] + PORT_PERST);
	gpiod_direction_output(pcie->perstn[idx], 1);
PCI Controller の デバイスドライバは、ここ(pcie_apple_m1_setup_port) にあります。デバイスドライバの中でも NUM_PORTマクロは、3になっています。
下記の部分は、電源制御部で Port (0) は 何らか<0 1>を設定していますが、Port (1) と Port (2) は何も設定されていません。
            devpwr-on-0 = <0 1>;
            devpwr-on-1 = <>;
devpwr-on-2 = <>;設定された値は、デバイスドライバの ここ(pcie_apple_m1_port_pwron) で次のような処理をやっています。<0 1> なので、GPIO を出力にして、1 をドライブする感じですね。
static void pcie_apple_m1_port_pwron(struct pcie_apple_m1 *pcie, unsigned idx)
{
	int i;
	u32 *seq = pcie->devpwron[idx].seq;

	for(i=0; i<pcie->devpwron[idx].num; i++) {
		usleep_range(2500, 5000);
		if(seq[1] < 2)
			gpiod_direction_output(pcie->devpwrio->desc[seq[0]], seq[1]);
		else if(seq[1] == 2)
			gpiod_direction_input(pcie->devpwrio->desc[seq[0]]);
		usleep_range(2500, 5000);
usleep_range(250000, 500000);
		seq += 2;
	}
}
下記の rerfclk-always-on-2 と max-speed-2 =<1> では、Port (2) に対する refrence clock (100MHz) を常に供給し、PCIe Gen1 (2.5GT/s) に設定しています。
これにより、Port (2)は GbE が繋がっているんだと思います。
refclk-always-on-2;
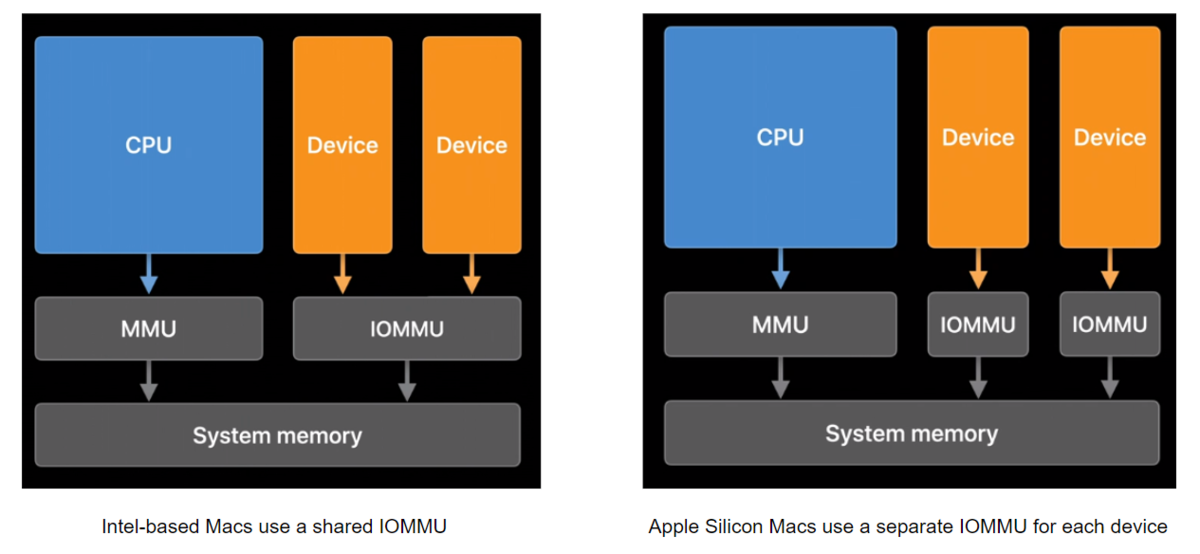
max-speed-2 = <1>; /* 2.5 GT/s */I/O MMU は、各ポートにそれぞれ付いています。
            iommu-map = <0x0000 &pcie_dart0 0x8000 0x0100>, /* fake, and should never be used as RC bridges don't DMA */
                        <0x0100 &pcie_dart0 0x0000 0x0100>,
                        <0x0200 &pcie_dart1 0x0000 0x0100>,
                        <0x0300 &pcie_dart2 0x0000 0x0100>;
Apple Siliconの説明のビデオにも出てきた各デバイス毎に I/O MMU が接続されていることが分かります (Apple M1内の各機能だけでなく、PCI Express もそのようになっています)
PCI Express Phy
一般的には PCI Express の各 Port 毎に Phy が付いているのですが、Apple M1 の 3つの PCI Express の Port に関しては、1つのPhy を 3つの Port を共有しているようです。
デバイスドライバの ここ の部分(pcie_apple_m1_setup_phy_global)が初期設定部分です。
2つのクロック(CLK0REQ, CLK1REQ)を設定して、PHYを REST => RUN にしているだけっぽいですが。
	rmwl(0, CORE_PHY_CTL_CLK0REQ, pcie->base_core[0] + CORE_PHY_CTL);
	res = readl_poll_timeout(pcie->base_core[0] + CORE_PHY_CTL, stat, (stat & CORE_PHY_CTL_CLK0ACK), 100, 50000);
	if(res < 0) {
		dev_err(&pcie->pdev->dev, "%s: global phy clk%d wait timed out.\n", __func__, 0);
		return res;
	}
	udelay(1);
	rmwl(0, CORE_PHY_CTL_CLK1REQ, pcie->base_core[0] + CORE_PHY_CTL);
	res = readl_poll_timeout(pcie->base_core[0] + CORE_PHY_CTL, stat, (stat & CORE_PHY_CTL_CLK1ACK), 100, 50000);
	if(res < 0) {
		dev_err(&pcie->pdev->dev, "%s: global phy clk%d wait timed out.\n", __func__, 1);
		return res;
	}
	rmwl(CORE_PHY_CTL_RESET, 0, pcie->base_core[0] + CORE_PHY_CTL);
	udelay(1);
	rmwl(0, CORE_RC_PHYIF_CTL_RUN, pcie->base_core[0] + CORE_RC_PHYIF_CTL);
udelay(1);この後に、以下のような、pcie_apple_m1_tunable という関数で、"tunable-xxxx" ものを抽出しているのですが、dts ファイルではそんなの設定していません。
	rmwl(0, 1, pcie->base_config + (idx << 15) + 0x8bc);
	snprintf(tunable_name, sizeof(tunable_name) - 1, "tunable-port%d", idx);
	res = pcie_apple_m1_tunable(pcie, tunable_name);
	if(res < 0)
		return res;
	rmwl(0x3000000, 0, pcie->base_config + (idx << 15) + 0x890);
	snprintf(tunable_name, sizeof(tunable_name) - 1, "tunable-port%d-gen3-shadow", idx);
	res = pcie_apple_m1_tunable(pcie, tunable_name);
	if(res < 0)
		return res;
	rmwl(0x3000000, 0x1000000, pcie->base_config + (idx << 15) + 0x890);
	snprintf(tunable_name, sizeof(tunable_name) - 1, "tunable-port%d-gen4-shadow", idx);
	res = pcie_apple_m1_tunable(pcie, tunable_name);
調べてみたら、Documentation/devicetree/bindings/arm/apple,pcie-m1.txt の中に以下のような説明がありました。「
Filled by bootloader:

- tunable-axi2af : settings applied to AXI bridge registers
- tunable-common : settings applied to root complex registers
- tunable-phy-ip-auspma : settings applied to PHY PMA registers
- tunable-phy-ip-pll : settings applied to PHY PLL registers
- tunable-phy : settings applied to PHY core registers
- tunable-fuse : settings applied to PHY registers based on on-chip fuses
- tunable-port%d-config : settings applied to port registers for port %d
- tunable-port%d : PCIe Gen1/2 settings applied to port config space
- tunable-port%d-gen3-shadow : PCIe Gen3 settings applied to port config space
- tunable-port%d-gen4-shadow : PCIe Gen4 settings applied to port config space
Apple M1で Linux をロードするまでのステップはどうなっているのかを調べてみた」を書くために preloader-m1 のソースコードを調べているときに、なんか出てきたのを思い出しました。ここ です。
    prepare_tunable(apple_dt, "/arm-io/apcie",             "apcie-axi2af-tunables",        linux_dt, "/soc/pcie", "tunable-axi2af",            TUNABLE_PCIE, 4);
    prepare_tunable(apple_dt, "/arm-io/apcie",             "apcie-common-tunables",        linux_dt, "/soc/pcie", "tunable-common",            TUNABLE_PCIE, 1);
    prepare_tunable(apple_dt, "/arm-io/apcie",             "apcie-phy-ip-auspma-tunables", linux_dt, "/soc/pcie", "tunable-phy-ip-auspma",     TUNABLE_PCIE, 3);
    prepare_tunable(apple_dt, "/arm-io/apcie",             "apcie-phy-ip-pll-tunables",    linux_dt, "/soc/pcie", "tunable-phy-ip-pll",        TUNABLE_PCIE, 3);
    prepare_tunable(apple_dt, "/arm-io/apcie",             "apcie-phy-tunables",           linux_dt, "/soc/pcie", "tunable-phy",               TUNABLE_PCIE, 2);
    prepare_tunable(apple_dt, "/arm-io/apcie/pci-bridge0", "apcie-config-tunables",        linux_dt, "/soc/pcie", "tunable-port0-config",      TUNABLE_PCIE_PARENT, 6);
    prepare_tunable(apple_dt, "/arm-io/apcie/pci-bridge0", "pcie-rc-gen3-shadow-tunables", linux_dt, "/soc/pcie", "tunable-port0-gen3-shadow", TUNABLE_PCIE_PARENT, 0);
    prepare_tunable(apple_dt, "/arm-io/apcie/pci-bridge0", "pcie-rc-gen4-shadow-tunables", linux_dt, "/soc/pcie", "tunable-port0-gen4-shadow", TUNABLE_PCIE_PARENT, 0);
    prepare_tunable(apple_dt, "/arm-io/apcie/pci-bridge0", "pcie-rc-tunables",             linux_dt, "/soc/pcie", "tunable-port0",             TUNABLE_PCIE_PARENT, 0);
    if(!strcmp(model, "J274")) {
        /* Mac Mini has xHCI and Ethernet */
        prepare_tunable(apple_dt, "/arm-io/apcie/pci-bridge1", "apcie-config-tunables",        linux_dt, "/soc/pcie", "tunable-port1-config",      TUNABLE_PCIE_PARENT, 10);
        prepare_tunable(apple_dt, "/arm-io/apcie/pci-bridge1", "pcie-rc-gen3-shadow-tunables", linux_dt, "/soc/pcie", "tunable-port1-gen3-shadow", TUNABLE_PCIE_PARENT, 0 | 0x8000);
        prepare_tunable(apple_dt, "/arm-io/apcie/pci-bridge1", "pcie-rc-gen4-shadow-tunables", linux_dt, "/soc/pcie", "tunable-port1-gen4-shadow", TUNABLE_PCIE_PARENT, 0 | 0x8000);
        prepare_tunable(apple_dt, "/arm-io/apcie/pci-bridge1", "pcie-rc-tunables",             linux_dt, "/soc/pcie", "tunable-port1",             TUNABLE_PCIE_PARENT, 0 | 0x8000);
        prepare_tunable(apple_dt, "/arm-io/apcie/pci-bridge2", "apcie-config-tunables",        linux_dt, "/soc/pcie", "tunable-port2-config",      TUNABLE_PCIE_PARENT, 14);
        prepare_tunable(apple_dt, "/arm-io/apcie/pci-bridge2", "pcie-rc-gen3-shadow-tunables", linux_dt, "/soc/pcie", "tunable-port2-gen3-shadow", TUNABLE_PCIE_PARENT, 0 | 0x10000);
        prepare_tunable(apple_dt, "/arm-io/apcie/pci-bridge2", "pcie-rc-gen4-shadow-tunables", linux_dt, "/soc/pcie", "tunable-port2-gen4-shadow", TUNABLE_PCIE_PARENT, 0 | 0x10000);
        prepare_tunable(apple_dt, "/arm-io/apcie/pci-bridge2", "pcie-rc-tunables",             linux_dt, "/soc/pcie", "tunable-port2",             TUNABLE_PCIE_PARENT, 0 | 0x10000);
"apcie-config-tunables", "pcie-rc-gen3-shadow-tunables", , "pcie-rc-gen4-shadow-tunables", , "pcie-rc-tunables" は、PCI Configuration Space のアドレスを設定するためのもので、
レジスタ空間の1番目の PCI Configuration Space の 0x0, 0x8000, 0x10000 を各Port に設定しています。
また、
/* Mac Mini has xHCI and Ethernet */
とありますね。となると、Mac Mini の Port (1) が xHCI (USB 3.0 Hub) で、Port (2) が Ethernet に決まりですね。
終わりに
Apple M1 には、PCI Express のポートが3つ付いていることが分かりました。また、このブログで2月1日に書きましたNVMe も PCI Express なので、Apple M1には4つの PCI Express が出ていることが分かりました。
実は、このブログを書いた後、Apple M1について、何を書いたかな?と振り返ってみたら、「Apple M1 Mac mini の PCIe 関連を調べてみた」でPCI Express について書いていたことが発覚。まー、すべてが同じということではないので、ちょっと内容を追加したので、そのままアップします。
参考ブログ:
vengineer.hatenablog.com