@Vengineerの戯言 : Twitter
SystemVerilogの世界へようこそ、すべては、SystemC v0.9公開から始まった
はじめに
このツイートから Xilinx の QEMU のソースコードを眺めることにしました
XilinxのQEMU環境、面白い。
— Vengineer@ (@Vengineer) 2021年3月5日
Zynq/ZynqMP/VersalのARMコアをQEMU上で動かして、
SystemC側のモデルと通信できる。
Verilatorを使うと、SystemC <=> Verilog HDL(SystemVerilog)ができるので、RTLも使える。
これは素晴らしい。。。
Edgar E. Iglesias さん、一人でやっているhttps://t.co/aofhE4Xrda
Xilinx の TLM-COSIM-DEMO
github.com の Xilinx に systemctlm-cosim-demo というものがあります。
これは、Xilinx の QEMU と LibSystemCTLM-SoC (SystemC/TLM-2.0 ベース) を使った subsystem のデモです。
QEMU側の Zynq, ZynqMP, Versal 側のモデルと、LibSystemCTLM-SoC側の PL(Programmable Logic)部分を SystemC や Verilog HDL で実装したモデルが通信して、全体が動きます。
下図はLMAC Demos の内、zynqmp_lmac2_demo を図示したものです。
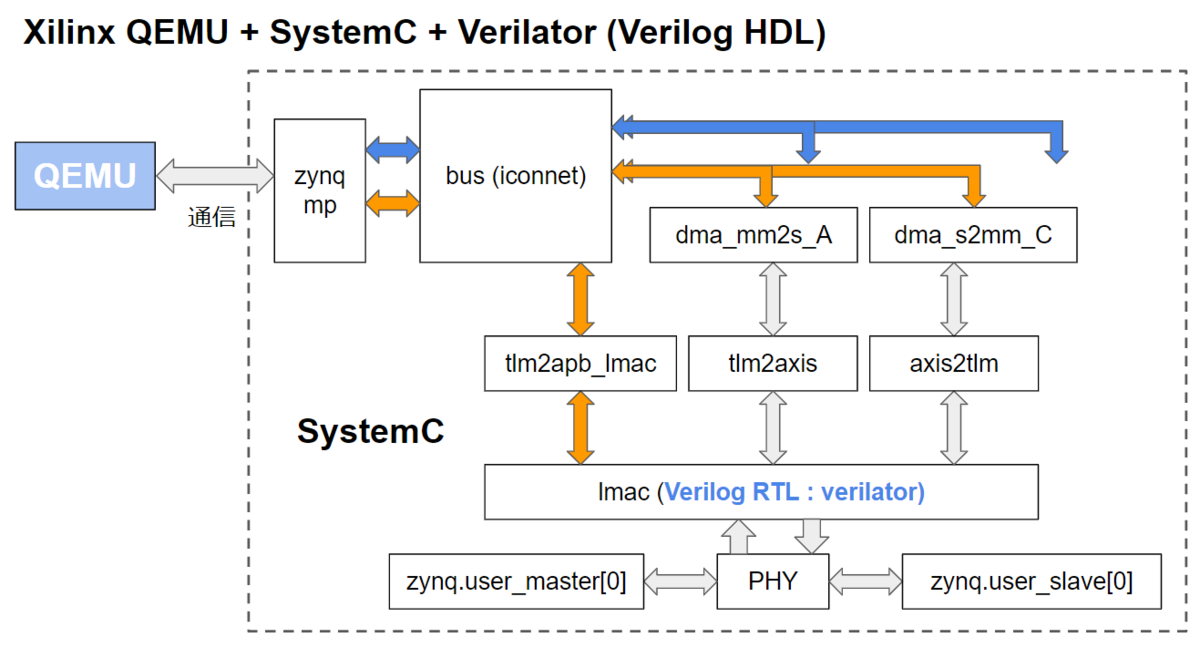
SystemC の部分の zynqmp が QEMU と通信しています。bus (iconnect) が内部バスになっています。オレンジ色の部分が レジスタアクセス用のバスで、青色の部分がDMA用のバスです。lmac だけが Verilog HDL で実装されています。lmac は verilator にてコンパイルされた .a を使っています。
PHY の両サイズに繋がっている zynq.user_master[0] と zynq.user_slave[0] は バックドア的なもので、QEMUからアクセスできます。
SystemCコードは、これ です。
sc_main の部分を見てみます。一見、SystemCのコードっぽいですが、Verlated:: という Verilator の機能を使って、Verilog HDLコードである lmac の部分を trace できるようにしています。
ただし、SystemCの trace file と Verilator の trace file は別ファイルになっています。
int sc_main(int argc, char* argv[])
{
	Top *top;
	uint64_t sync_quantum;
	sc_trace_file *trace_fp = NULL;

#if HAVE_VERILOG_VERILATOR
	Verilated::commandArgs(argc, argv);
#endif

	if (argc < 3) {
		sync_quantum = 10000;
	} else {
		sync_quantum = strtoull(argv[2], NULL, 10);
	}

	sc_set_time_resolution(1, SC_PS);

	top = new Top("top", argv[1], sc_time((double) sync_quantum, SC_NS));

	if (argc < 3) {
		sc_start(1, SC_PS);
		sc_stop();
		usage();
		exit(EXIT_FAILURE);
	}

	trace_fp = sc_create_vcd_trace_file("trace");
	trace(trace_fp, *top, top->name());

#if VM_TRACE
	Verilated::traceEverOn(true);
	// If verilator was invoked with --trace argument,
	// and if at run time passed the +trace argument, turn on tracing
	VerilatedVcdSc* tfp = NULL;
	const char* flag = Verilated::commandArgsPlusMatch("trace");
	if (flag && 0 == strcmp(flag, "+trace")) {
		tfp = new VerilatedVcdSc;
		top->lmac->trace(tfp, 99);
		tfp->open("vlt_dump.vcd");
	}
#endif

	/* Pull the reset signal.  */
	top->rst.write(true);
	sc_start(1, SC_US);
	top->rst.write(false);

	sc_start();
	if (trace_fp) {
		sc_close_vcd_trace_file(trace_fp);
	}

#if VM_TRACE
	if (tfp) { tfp->close(); tfp = NULL; }
#endif
	return 0;
}
SystemC側の起動
SystemC側は次のようなコマンドで実行します。環境変数(LD_LIBRARY_PATH)でSystemC 2.3.2 の ライブラリパスを指定して、./zynqmp_demo に2つの引数 (unix:./qemu-tmp/qemu-rport-_amba@0_cosim@0 と 10000) を与えています。
LD_LIBRARY_PATH=/usr/local/systemc-2.3.1/lib-linux64/ ./zynqmp_lmac2_demo \
unix:./qemu-tmp/qemu-rport-_amba@0_cosim@0 10000最初の引数は、QEMU側との通信に使う socket 名です。生成される socket は、/qemu-tmp ディレクトリの下の qemu-rport-_amba@0_cosim@0 という名前になります。
二番目の引数は、SystemC の sync_quantum値です。QEMUとSystemCシミュレータの同期のタイミングの間隔を指定します。
上記のコマンドを実行すると、下記のように SystemCシミュレータが動作し、connect to /qemu-tmp/qemu-rpott_amba@0_cosim@0 というメッセージを出して止まります。SystemCシミュレータは、QEMU側が /qemu-tmp/qemu-rpott_amba@0_cosim@0 というsocket と繋げるのを待ちます。
        SystemC 2.3.1-Accellera --- Jul 11 2019 10:13:23
        Copyright (c) 1996-2014 by all Contributors,
        ALL RIGHTS RESERVED
connect to /qemu-tmp/qemu-rport-_amba@0_cosim@0
QEMU側の起動に必要な Device Tree
QEMU側の起動には、SystemC側との通信機能を追加した dts (Device Tree) が必要です。
ZynqMP では、zcu102-arm.cosim.dts になります。この zcu102-arm.cosim.dts はQEMUではなく、github の https://github.com/Xilinx/qemu-devicetree にあります。zcu102-arm.cosim.dts の中を見てみると、2つのファイルを include しているだけです。
#include "zcu102-arm.dts"
#include "zynqmp-pl-remoteport.dtsi"
2つ目の zynqmp-pl-remoteport.dtsi が SystemC側との通信機能を追加する Device Tree です。
amba: amba@0 ノードの下に cosim_rp_0: cosim@0 があります。これが SystemC側と接続するためのノードです。
SystemC側の起動において、第1引数に指定した、unix:./qemu-tmp/qemu-rport-_amba@0_cosim@0 の amba@0_cosim@0 部分が amba@0 ノードの下の cosim@0 に対応しています。
その後が ZynqMP の PS と PL が接続する各ポートの部分を抜き出したものです。各ノードには、remote-ports = <&cosim_rp_0 XX>とcosim_rp_0 の XX ポートに接続するしています。
- hmp_lpd : (11)
- hpc0_fpd : (0)
- hpc1_fpd : (1)
- hp0_fpd : (2)
- hp1_fpd : (3)
- hp2_fpd : (4)
- hp3_fpd : (5)
- axi_lpd : (6)
- acp_fpd : (7)
- ace_fpd : (8)
/ {
	#address-cells = <MEMORY_ADDRESS_CELLS>;
	#size-cells = <1>;

        amba: amba@0 {
		cosim_rp_0: cosim@0 {
			compatible = "remote-port";
			sync = <1>;
			chrdev-id = "pl-rp";
		};

		/* FIXME: This should only be accessible by the RPU.  */
		hpm_lpd: hpm_lpd@40000000 {
			compatible = "remote-port-memory-master";
			remote-ports = <&cosim_rp_0 11>;
			reg = <BASE_ADDR(0x80000000) 0x20000000>;
		};

		hpc0_fpd: hpc0_fpd@0 {
			compatible = "remote-port-memory-slave";
			remote-ports = <&cosim_rp_0 0>;
			mr = <&smmu_tbu0>;
		};
		hpc1_fpd: hpc1_fpd@0 {
			compatible = "remote-port-memory-slave";
			remote-ports = <&cosim_rp_0 1>;
			mr = <&smmu_tbu0>;
		};
		hp0_fpd: hp0_fpd@0 {
			compatible = "remote-port-memory-slave";
			remote-ports = <&cosim_rp_0 2>;
			mr = <&smmu_tbu3>;
		};
		hp1_fpd: hp1_fpd@0 {
			compatible = "remote-port-memory-slave";
			remote-ports = <&cosim_rp_0 3>;
			mr = <&smmu_tbu4>;
		};
		hp2_fpd: hp2_fpd@0 {
			compatible = "remote-port-memory-slave";
			remote-ports = <&cosim_rp_0 4>;
			mr = <&smmu_tbu4>;
		};
		hp3_fpd: hp3_fpd@0 {
			compatible = "remote-port-memory-slave";
			remote-ports = <&cosim_rp_0 5>;
			mr = <&smmu_tbu5>;
		};
		axi_lpd: axi_lpd@0 {
			compatible = "remote-port-memory-slave";
			remote-ports = <&cosim_rp_0 6>;
			mr = <&amba>;
		};
		acp_fpd: acp_fpd@0 {
			compatible = "remote-port-memory-slave";
			remote-ports = <&cosim_rp_0 7>;
			mr = <&cci_slave>;
		};
		ace_fpd: ace_fpd@0 {
			compatible = "remote-port-memory-slave";
			remote-ports = <&cosim_rp_0 8>;
			mr = <&cci_slave>;
		};
       ....
        };
下の方に行くと、
- hpm0_fpd : (9)
- hpm1_fpd : (10)
もあります。
	protected_amba: protected_amba@0 {
		/*
		 * HPM0 has 3 appertures that all map onto the same AXI port.
		 * 0x0000.a0000000 - 0x0000.b0000000   (256MB)
		 * 0x0004.00000000 - 0x0005.00000000   (4GB)
		 * 0x0010.00000000 - 0x0048.00000000   (224GB)
		 */
		hpm0_fpd: hpm0_fpd@a0000000 {
			compatible = "remote-port-memory-master";
			remote-ports = <&cosim_rp_0 9>;
			reg = <0x0000 0xa0000000 0x00 0x10000000 0x0
			       0x0004 0x00000000 0x01 0x00000000 0x0
			       0x0010 0x00000000 0x38 0x00000000 0x0 >;
		};

		/*
		 * HPM1 has 3 appertures that all map onto the same AXI port.
		 * 0x0000.b0000000 - 0x0000.c0000000   (256MB)
		 * 0x0005.00000000 - 0x0006.00000000   (4GB)
		 * 0x0048.00000000 - 0x0080.00000000   (224GB)
		 */
		hpm1_fpd: hpm1_fpd@b0000000 {
			compatible = "remote-port-memory-master";
			remote-ports = <&cosim_rp_0 10>;
			reg = <0x0000 0xb0000000 0x00 0x10000000 0x0
			       0x0005 0x00000000 0x01 0x00000000 0x0
			       0x0048 0x00000000 0x38 0x00000000 0x0 >;
		};
	};
各ポートの compatible が "remote-port-memory-master" のものは、QEMU 側が SystemC側にアクセスするもので、reg にアドレス空間がマップされています。
- hpm_lpd
- hpm0_fpd
- hpm1_fpd
各ポートの compatible が "remote-port-memory-slave" のものは、SystemC側が QEMU 側にアクセスするものです。
- hpc0_fpd
- hpc1_fpd
- hp0_fpd
- hp1_fpd
- hp2_fpd
- hp3_fpd
- axi_lpd
- acp_fpd
- ace_fpd
Zynq UltraScale+ MPSoC テクニカル リファレンス マニュアル (UG1085) の Page.17 の図 1‐1: Zynq UltraScale+ MPSoC の最上位ブロ ッ ク図をPLとの接続部分を抜き出してみました。信号名はだいたい合っています (axi_lpd は,PL_LPDに対応指定るっぽいですね)

SystemC 側の ZynqMP モデル
SystemC 側の ZynqMP モデルのヘッダーファイルは、こちら。QEMU側と一対一のポートになっています。
	remoteport_tlm_memory_master rp_axi_hpm0_fpd;
	remoteport_tlm_memory_master rp_axi_hpm1_fpd;
	remoteport_tlm_memory_master rp_axi_hpm_lpd;

	remoteport_tlm_memory_slave rp_axi_hpc0_fpd;
	remoteport_tlm_memory_slave rp_axi_hpc1_fpd;
	remoteport_tlm_memory_slave rp_axi_hp0_fpd;
	remoteport_tlm_memory_slave rp_axi_hp1_fpd;
	remoteport_tlm_memory_slave rp_axi_hp2_fpd;
	remoteport_tlm_memory_slave rp_axi_hp3_fpd;
	remoteport_tlm_memory_slave rp_axi_lpd;
	remoteport_tlm_memory_slave rp_axi_acp_fpd;
	remoteport_tlm_memory_slave rp_axi_ace_fpd;
QEMU側の Device Tree の各ノードの remote-ports = <&cosim_rp_0 XX> の XX に対応するポート番号は、ここで使われています。
	// Register with Remote-Port.
	register_dev(0, &rp_axi_hpc0_fpd);
	register_dev(1, &rp_axi_hpc1_fpd);
	register_dev(2, &rp_axi_hp0_fpd);
	register_dev(3, &rp_axi_hp1_fpd);
	register_dev(4, &rp_axi_hp2_fpd);
	register_dev(5, &rp_axi_hp3_fpd);
	register_dev(6, &rp_axi_lpd);
	register_dev(7, &rp_axi_acp_fpd);
	register_dev(8, &rp_axi_ace_fpd);

	register_dev(9, &rp_axi_hpm0_fpd);
	register_dev(10, &rp_axi_hpm1_fpd);
	register_dev(11, &rp_axi_hpm_lpd);
デモのSystemCモデルでは、[https://github.com/Xilinx/systemctlm-cosim-demo/blob/master/zynqmp_lmac2_demo.cc:title=これらのポートの内、axi_hpc_fpd[0] (PS => PL) と axi_hpm_fpd[0] (PL => PS) を使っています]。ここで使っているポート以外にアクセスすると動かないので注意が必要です。
		bus->memmap(0x0LL, 0xffffffff - 1,
				ADDRMODE_RELATIVE, -1, *(zynq.s_axi_hpc_fpd[0]));

		zynq.s_axi_hpm_fpd[0]->bind(*(bus->t_sk[0]));